The Manual
The Swarm Maker
Once you’ve chosen to go on a Mission, you’ll be shown the Swarm Maker. This UI will allow you to select the Beetle or Beetles which will make up your swarms.
A Swarm is a cloned version of a Beetle of your choosing. They look and function just like the beetle you selected; however only the original beetle will return to the nest if you win a mission. However, if you fail the mission your original chosen beetle runs a serious risk of dying also!
Each Mission has restrictions on how many swarms you can take from 1 up to 5. The Swarm Maker allows you to set how many beetles will be in each swarm from 10 – 35. Mind you 5 swarms is a LOT of beetles to herd! And they have a rather limited attention span.
The cost in Goop to attempt a mission is proportional to the number of clones and how powerful your chosen beetle is. This is an entry cost and the swarm you build cannot be reused. Remember, missions will not provide new Goop nor refund Goop spent. However, any time before you commit to attacking, you may cancel the operation and no Goop will be spent.
Other Costs
If one of the Beetle you select to form a Swarm from is unhappy, the per-unit Goop cost for that Swarm is increased.
Cloning a Beetle takes a lot out of them. After the Combat Mission is complete, you will notice that each of the Beetles you selected has reduced Happiness, due to an impact on several of their Needs. Keep this in mind if you plan on retrying the Mission immediately.
Attack Type Advantages
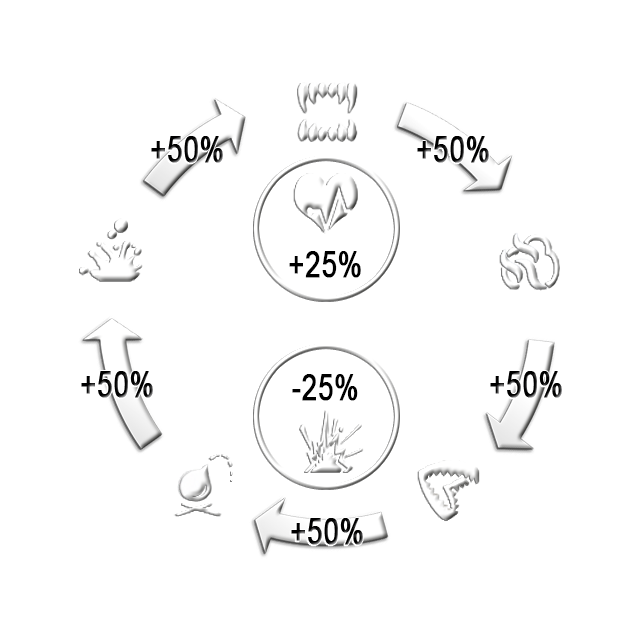
Beetles with a specific Attack Type may have a combat advantage over other Beetles. This results in a percentage increase in the damage caused by an attack. The diagram below represents the Rock/Paper/Scissors nature of the advantages. From the top, clockwise:- Vampire has a 50% damage increase to Reek.
- Reek has 50% damage increase to Bite.
- Bite has a 50% damage increase to Spit.
- Spit has a 50% damage increase to Acid.
- Acid has a 50% damage increase to Vampire.
- All five of the above attack types have a 25% *decrease* in damage to Immolator.
- All six of the above attack types have a 25% damage increase to Healer.
- Immolators
have no damage advantage when attacking other bugs, but have 100%
damage increase when attacking destructible objects in combat.